
In my next 2 blog posts I’m going to be talking about a couple of great utilities to enhance the way your games look by adding various effects that may not be present by default. These 2 utilities are NVIDIA Inspector and SweetFX. In this blog, I’ll focus on NVIDIA Inspector, and in the next one SweetFX. As its name would suggest, you’ll need an NVIDIA graphics card to run Inspector. There are similar tools available for AMD cards, although I have no experience with them. SweetFX will run on any hardware.
First, a little background…
In the days where around 95% of games have a home console (Xbox 360 or PlayStation 3) as the lead development platform, it means that the PC versions are usually ports – sometimes shoddy, sometimes on a par with their console versions and sometimes improved, including higher resolution textures and DirectX 11 features.
The fact that a modern gaming PC (or even a household PC of a value of around £500) is much more powerful than a console, which contain budget-priced hardware from 7 years ago, should mean that games developed for a PC should run and look much better. Sometimes, they do and sometimes they don’t. Unfortunately, because the majority of games are developed for the much weaker consoles means that developers have to cut corners to maintain an achievable frame rate and have the game running smoothly. These corners are normally visual – things such as tessellation, anti-aliasing and ambient occlusion.
One such example that I’ve been playing recently is Spec Ops: The Line – itself a decent game which runs well on my PC; however it lacks some visual enhancements. The first thing I noticed upon loading it up was the lack of any anti-aliasing. For those that don’t know, anti-aliasing is a technique used to smooth jagged lines by implementing a blur – there’s some screenshots further down. There’s several different types of anti-aliasing with varying degrees of effectiveness and efficiency. I won’t go into too much detail as to how each work, but the more popular methods are FXAA (less demanding, a post-process technique but can cause too much blur for some people), MSAA (demanding technique but is effective), SSAA (very demanding but effective – renders the screen at a higher resolution and then downsamples it), SMAA (another post-process technique like FXAA, less demanding and quite effective) TXAA (new, NVIDIA-only method which is a mixture of FXAA and MSAA – works well, but hardware limited).
Console games either have no anti-aliasing or tend to implement some form of FXAA as it is cheap on resources and fairly effective. PC games vary, although there’s usually a choice of MSAA, CSAA (another older method) and more recently FXAA – it’s up to the developer. Like with Spec Ops, sometimes there’s none!
Which is where these tools come in…
First up is NVIDIA Inspector, which can be downloaded from here.
So, what does it do? Lots of things! Upon loading it up, it will display information about your graphics card. Here’s a screenshot of mine.

The observant amongst you will see I’ve modified by graphics card’s BIOS – more on that in another post… Also, the latest version of this has a small bug which displays the overclocking section of the program upon start-up, whereas it should be hidden and then you click “Show Overclocking” to reveal it. It’s fine though. I personally use EVGA Precision X for graphics card overclocking anyway as it has more features. Aside from that it shows your temperatures, clock speeds on core and memory, fan speed and voltage.
Additionally, and perhaps most importantly, the application allows you to set a profile for each game on your PC, and then customise those profiles to force properties such as anti-aliasing and ambient occlusion. You can also set compatibility bits for SLI, if NVIDIA haven’t released their own (they’re pretty good at doing that though). If you’re familiar with the built-in NVIDIA Control Panel that is installed with their graphics drivers, then think of this as a much more advanced version of that.
If you click the little spanner and screwdriver icon next to the driver version field, it will open up the interesting bit of the program (it will require admin privileges).

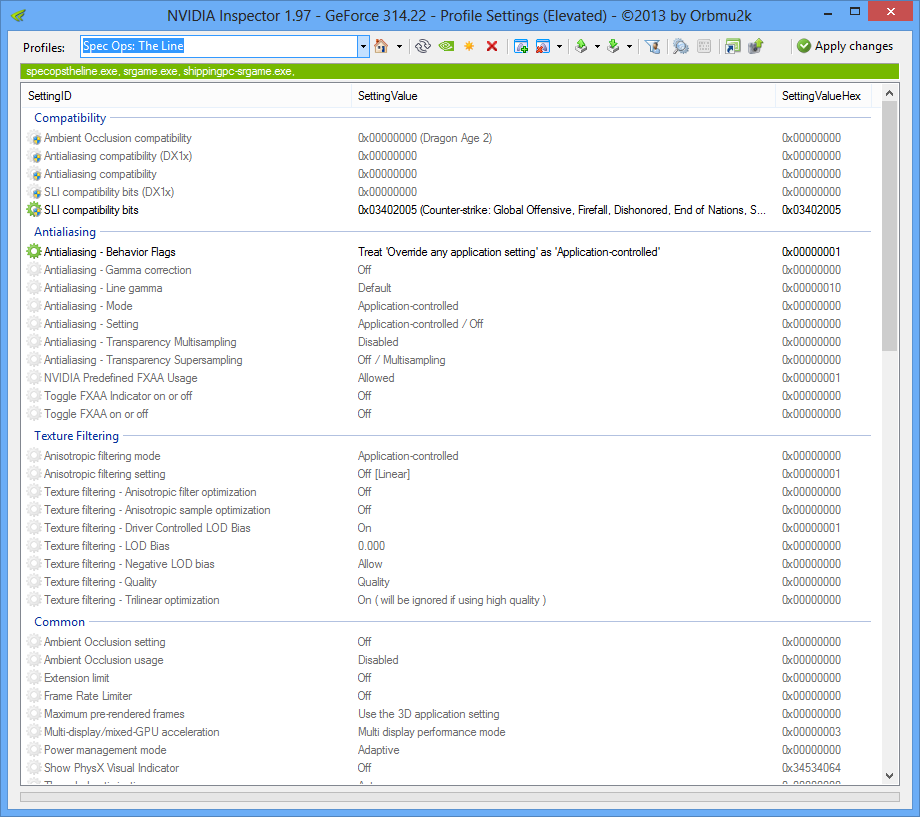
By default it will show your global profile. This, as the name suggests, is the profile containing settings that are applied globally – to every game you run. Generally speaking, you don’t want to set anything in here (setting V-Sync would be OK – I use adaptive). If you click the dropdown in the top left, it will show all of the profiles that the application has built-in (which is updated with each release). There’s a ton of games. But if you have a newly released game and it’s not included, you can create a New Profile using the controls, add the game executable to it and then edit that profile. I’ll be using Spec Ops as an example, which is already included and so I didn’t have to create a new one – just edit the existing.
Upon selecting Spec Ops: The Line from the list, the default profile is shown, which blank aside from the SLI compatibility bits.
Now for the demo. Like I said, by default the game has no anti-aliasing options – you won’t find any in the graphics settings to enable. This means that it needs to be forced. This is what a portion of the title screen looks like with no anti-aliasing at all:
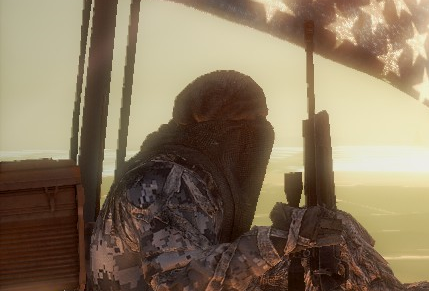
Check those jaggies in the flag pole and, well, pretty much everywhere (click to enlarge, as with all images on this blog). So, let’s force some AA!
Back in NVIDIA Inspector, select the Spec Ops: The Line profile again, and set the following:
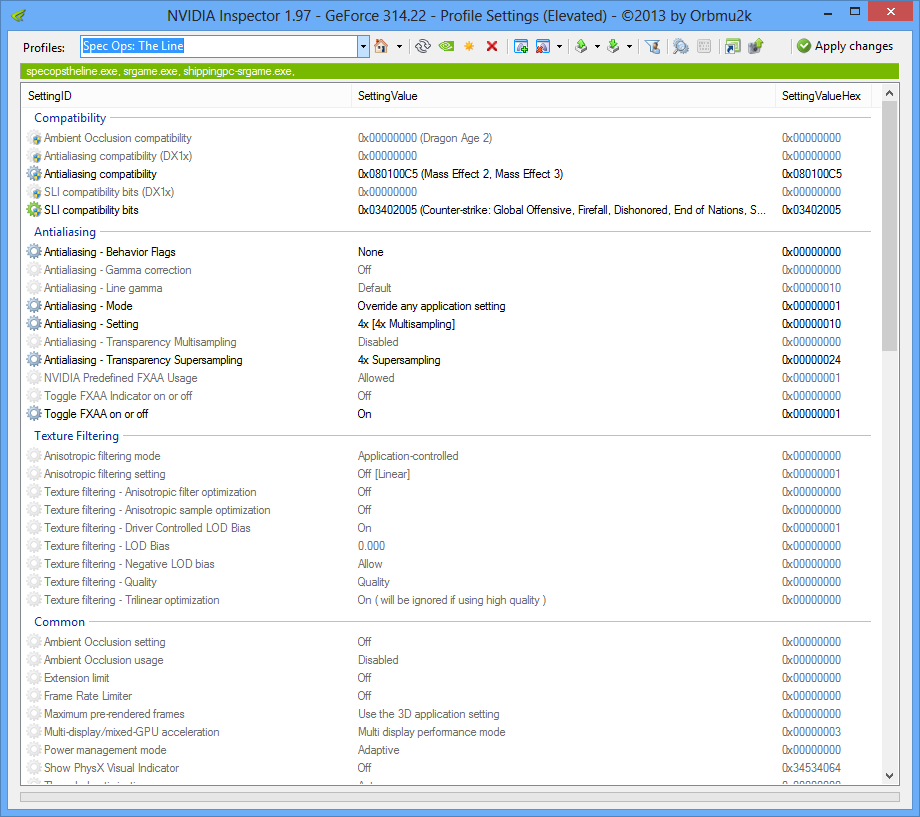
I’ve forced 2 types of anti-aliasing with these settings – FXAA and MSAA. On their own, both do a decent job but will miss some jaggies due to the techniques they use – but when combined they do a good job.
The first thing we set is the Anti-aliasing compatibility flag. Games run on a particular engine (UE3 in this case, others include Havok, CryTek and Frostbite), and each engine usually shares the same flag which tells Inspector how to apply the anti-aliasing. Unfortunately there’s no massive database of which flags to use on which game – sometimes NVIDIA Inspector will know and select it, but others you’ll have to either experiment yourself or have a Google. Most times, if a game doesn’t have anti-aliasing, you can be sure that a PC enthusiast out there has already experimented and figured out how to force it. In this case, because the game uses the Unreal Engine 3, it shares the same flag as the Mass Effect series. Next up, we set the behaviour flags to None, the mode to Override and then we set the type of anti-aliasing and supersampling (the two go hand in hand). I’ve gone for 4x on both, although you can set it to 2x if your PC isn’t up to it, or even higher if it is (although it’s probably overkill – 4x is enough). Like I said, I’ve forced FXAA too, as can be seen in the ‘Toggle FXAA on or off” field.
Apply the settings in the top right, and re-load the game. Screenshot time!

Hopefully you can see in improvement – again, particularly on the flag poles to the left of the soldier’s head. Anti-aliasing (and lack of) is always more noticeable in motion, too.
That’s pretty much it for forcing anti-aliasing. You find the compatibility bit (I recommend this thread at Guru3d which will either contain the information you need, or you can register, post and ask and someone will know) and apply it, then choose the type of anti-aliasing you want and then apply the changes.
Further down you can see the ambient occlusion options – these work in pretty much the same way – you find the compatibility bit and then choose the level of AO you’d like (Performance, Quality or High Quality). Note that hardware-forced ambient occlusion is very demanding on the graphics card. For example I can run the original Bioshock maxed out with my card downclocking itself to ~1006MHz to save power and having about 45% usage – that’s how undemanding it is (it is 6 years old, to be fair). However, if I force Ambient Occlusion in Inspector and set it to High Quality, my graphics card maxes out its core clock (1267MHz) and runs at about 80% usage just to maintain 60fps – something I’d expect from a brand new, more graphically impressive game. As a result, temperature and noise is more noticeable (although still acceptable), and there isn’t much visual improvement in the game. The reward versus the performance generally isn’t worth it.
Part 2 will be on SweetFX which is a utility that injects some post-processing effects to make your game look much better, including SMAA anti-aliasing and HDR and bloom effects.
