Force the Windows 10 Anniversary Update

3 Aug

Long time no post! But I’m going to get back into the swing of things. For now though, here’s a short but sweet one.

As you probably know, Microsoft have just released the Anniversary Update for Windows 10 – a ‘major’ feature update one year on from the OS’s original release.

It will eventually be pushed to everyone as an automatic update. However if it hasn’t come through to you yet and you’re like me and impatient, you can force the update by using the ‘Update Assistant’ tool downloadable from the Windows 10 Update History page here!

Happy Updating!

Register for a free host name

26 Jul

Remember in my blog post about setting up a Murmur server I mentioned getting your own free host name? Well, here’s how!

I’ll reiterate what I said in that blog post to explain why you might want one – when you want to connect to your PC for whatever reason over the internet (such as hosting a voice server, a game server or even for remote desktop), you’ll usually need to know the external IP address of the machine so that you can identify it on the internet. This isn’t very user friendly – who wants to remember a load of numbers (that are likely to change over time as your ISP gives you new IPs)? A host name allows you to refer to your PC by a more human-friendly name (e.g. server1.zapto.org).

To get one, it’s easy!

  1. Go to http://www.noip.com/ and register (it’s free).
  2. Once you’re signed up and in, go to https://www.noip.com/members/ and select Manage Hosts.
  3. Click Add Host and you’ll be taken to a form where you can choose your host name. You’ll need to set the Host Type to DNS Host (A). You’ll also need to provide your external IP address, which you can find out by going to Google and searching “What is my IP address?”. Everything else can be left as is.
  4. Click Done and that’s it. Give it a minute and it should be in effect. If you set up a Murmur server, restart it and then try and get someone to connect to it externally using your host name rather than an IP address!

I mentioned earlier that ISPs may assign new external IP addresses to their customers. For some ISPs you can pay extra for this not to happen, but for most it will. Personally, this happens only once every couple of weeks, and usually only after rebooting my modem. If you get a new IP (check using Google) you’ll need to update your settings on No-IP and enter your new IP address. You won’t immediately notice if you’ve got a new IP address, but for one thing people won’t be able to connect to your server.

To bypass this, you can set up DynamicDNS – but that’s for another time!

As always, thanks for reading. Any questions, just ask.

Organising your iTunes Music Library (some useful features of iTunes)

20 Jul

I have a confession. I’m slightly OCD when it comes to my music and its meta-data. Every song title must be capitalised correctly, titled correctly if there’s a featuring artist – it goes “Song Title (feat. Featured Artist)” by the way – and assigned the correct genre etc. (although I’m pretty vague with those, so anything like Rock, Metal or Pop will do).

My iTunes library is about 10 years old – right back from when I got my first iPod Mini and low-quality and unorganised music from Limewire and WinMX were all the rage. Things have come a long way since then – music has been deleted, re-acquired, moved, changed, whatever. Over the years, my iTunes library music folder had become a bit messy. There were empty folders where songs once were, folders named incorrectly etc. I’ve had about 4 different computers since then, and so it has been moved countless times. My iPod’s hard drives have failed, or my PC hard drives have, and I’ve had to recover music from one source or another. Long story short, there’s gaps.

Luckily, iTunes actually has some really awesome features to keep your iTunes library organised, although they’re not all well known.

Keep iTunes Media Folder Organised

Somewhere along the way, iTunes adopted a new folder structure for the library. Now, you have an iTunes folder within your user Music folder (i.e. Users\Carl\Music) with certain subfolders for media, album artwork and library-related XML files. Further down, in your Users\Carl\Music\iTunes\iTunes Media folder there are more subfolders for the different kinds of media. Screenshot below.

itunes1

Within here are all of your apps, music, movies – whatever is in your iTunes. They are (or should be) named according to their names within iTunes. When you change a song title, you want that change to be made to the underlying file too. For example, if you have a song as being made by Adele, but it was actually by Aerosmith, you’d want the song to be moved to the Aerosmith folder (assuming it already exists and you have Aerosmith) or for an Aerosmith folder to be created to place the song. iTuens can do all this automatically, and move your files to use its folder structure. The option is under Edit > Preferences > Advanced > Keep iTunes Media Folder Organised.

The first time you check this folder, iTunes will scan your files and organise them which may take a few mins depending on the size of your library. From then on, every time you add, delete or rename a file, iTunes will organise it accordingly. Also note that if you uncheck, click OK, and then go back to the Preferences and check the option again, you can force iTunes to re-scan and re-organise your library – useful if you’d added a lot of songs recently or changed some or whatever and want to keep everything tidy. Technically iTunes should keep on top of things, but I do this once in a while just to make sure – it seems to do something when I do it so why not?

itunes2

Copy files to iTunes Media folder when adding to library

Another feature that can actually be seen in the screenshot above, right below the option to keep the iTunes Media folder organised, it to have iTunes created a copy of any media added to the library.

In effect, what this means is that all you have to do it drag and drop a music folder or MP3 file into your library/iTunes window, and iTunes will automatically create a copy of those files and put them in your iTunes Media library all nice and organised according to its structure. You can then delete the original copy (for example, from your Desktop or Downloads folder or wherever). This is much nicer than having to manually move music in your iTunes Media folder and then use the File > Add Files To Library option.

Organise Library

It has such an obvious name, but it’s actually not that well known. Under File > Library is an option to Organise Library which displays the following window.

itunes3

The two options are fairly well explained. But basically, this is a perfect tool to get your iTunes Library perfectly in order.

With the first option, iTunes will create a copy of your entire library and organise it for you. This means that it double-checks all song names, artist names, folder names etc. are correct and re-does your entire iTunes Media folder for you, removing any empty folders etc. Used together with the second option,. it will create the structure outlined previously (Music, Movies, TV Shows folders) and place all your media accordingly.

On a side note, unrelated to this blog post really – I still use iTunes 10 as I tried iTunes 11 and found it to be completely useless. My iPhone would fail to properly sync, artwork would be missing and the new font and general UI is ugly  – its only saving grace was that the enhanced mini-player was pretty cool.

Screen capture software

13 Jul

Just FYI, I use the excellent, free and open-source tool Greenshot for my screen capturing. It’s available to download from here.

After installation it runs in the background (with a very small footprint) and when configured correctly (which isn’t hard), allows you to press Print Screen and then select which area of the screen you’d like to capture with a drag and drop tool (the Alt+Print Screen function also still works as usual). After that, it opens a basic image editor and allows you to either edit or save the file.

It’s a really neat and elegant solution that greatly improves upon the built-in Windows Print Screen function, so I’d really recommend it – especially if you write up a lot of guides or documentation etc.

Virtualisation and setting up your own virtual machine

12 Jul

Hey all

This post I’m going to talk about virtualisation and then touch upon how to make your own virtual machine in a home environment. In a future post I’ll demonstrate virtualisation as you’d see it in a business environment.

Virtualisation (and I’m pretty much going to copy Wikipedia with this definition) is the simulating of hardware platform, operating system, storage device or network resources. This brings several benefits which I’ll explain.

Think of a business and their network/IT setup. A typical company needs file storage, email management, a domain environment and probably some printers (amongst other things). For each of these roles, they would usually have separate, dedicated servers (although it’s possible to have more than one role on a server, generally speaking – and necessary for Exchange – it’s best practice to have them on dedicated, separate ones). Servers are effectively powerful computers with higher-quality components – how powerful they are depends on how much you spend on one obviously. But how much power is really needed to be a domain controller, a printer server or store a load of files? In terms of CPU and RAM: very little, and indeed a server will actually spend most of its time idle or quietly going about its business without ever really breaking a sweat. So, you could potentially have 5 dedicated, expensive servers costing thousands of pounds, and them barely being used to their potential – just for the sake of best practices. Enter VMware (disclaimer: other virtualisation tools available).

VMware allows you to run multiple ‘virtual machines’, entire Windows or Linux or whatever installations, on a single computer. They are entirely separate from each other, and use the host machine’s hardware resources accordingly. Suddenly, you can buy just one server and have all 5 of your required roles on it, which is a very cost effective solution. You can even scale your required hardware accordingly, and buy a cheaper, less-powerful microserver and ensure you’re using it to the max. An entire network running on a few hundred pounds of equipment rather than thousands.

Alternatively, virtualising a different or older operating system is useful for compaitibility. Imagine an old application, written in 2004 and never updated. It was designed to work on Windows XP, and will not run on Windows Vista, 7 or 8 – but it’s critical to your business. It’s expensive to hire a software developer to rewrite or update the software. So, what can you do? Run it in a virtual machine! Or, well, downgrade your computers to Windows XP – but that sucks, get with the times!

In fact, Microsoft actually accounted for this with Windows 7 Professional by including (as an optional download) XP Mode. which uses Microsoft’s own virtualisation technology to run a Windows XP installation within Windows 7. This was pretty cool as it allowed the application to appear as a normal entry in your Start Menu (although with “XP Mode” next to its name) and then only the application would run within a VM – the experience was fairly transparent to a normal user. Regardless, if you don’t have Windows 7 Professional/Enterprise/Ultimate, there are other ways to create VMs and virtualise applications.

Finally, virtual machines are good for just testing things out, or reminiscing about simpler times. I’ve set up 2 recently – one to check out the Windows 8.1 Developer Preview (blog incoming on that) and one due to bad website design – I was applying for a job, and their online application system required Windows XP, Vista or 7. I’m using Windows 8. Amazingly, I couldn’t use their system. So, I created Windows 7 VM (no need to enter a product key or activate it because it was only a short-term thing) and used that instead for their online system. Ridiculous, but hey, it worked. Maybe they’ll appreciate my workaround!

Anyway, the first thing to do it make sure your computer is powerful enough to run a virtual machine. Don’t forget, you are effectively allocating your computer’s resources to another computer which will run within your computer. Computerception. RAM will be the most crucial resource here. If you’re not sure of your computer’s specification, I’d recommend the aptly named Speccy software application (http://www.piriform.com/speccy/download/standard) which I’ve mentioned before. You’ll probably want at least 3GB of RAM in your PC to run a decent virtual machine and be able to allocate it 1GB.

Anyway, VMware Player is the key application here, and is a free download from http://www.filehippo.com/download_vmware_player/. As a note, I like to use FileHippo for downloads as it doesn’t make you use a sign up process, or browser-based installations or any of that rubbish. Just good ol’ standalone executables/MSIs.

Assuming you’ve installed VMware Player (which requires a reboot), next you’ll need an ISO image of your operating system of choice. I won’t ask how you got them – I’ll be an optimist and assume it’s all nice and legal.

Open up VMware Player and you’ll see the home screen with an option to Create a New Virtual Machine, which when clicked will start a wizard. Ah, wizards.

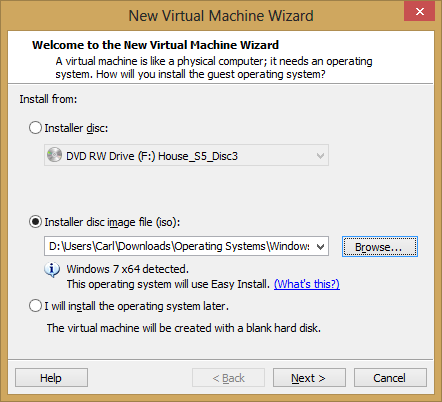
From here, either select the disc location (if you have a disc) or browse to the ISO file. Upon selecting an ISO, VMware Player will try and detect the operating system and may try to simplify the install using its ‘Easy Install’ which will automate the actual installation of Windows and the usual initial setup steps, like creating a username and password, by asking you for it during the wizard beforehand. If it doesn’t detect the OS, then don’t worry. There’s an alternative method which I’ll add to the bottom of this post.

Image

In the image above, I’ve browsed to a Windows 7 Professional ISO. Clicking Next will prompt you for the Easy Install info – you’ll need to enter a name at least, select the version of WIndows if you have a full fat ISO (Windows 7 ISOs actually contain all of the data for every version of the OS – what is installed depends on your selection/product key entered) and a Windows product key depending on your version (i.e. for Windows Vista and 7, you don’t need to enter one and you can use the OS for 30 days before having to activate it. Windows XP is more strict and requires a Product Key during installation…). Click Next once you’re done – you’ll be warned about not entering a product key, but just continue anyway. Now you can give the VM a name and choose its location (defaults are fine). Clicking Next yet again allows you to specify the maximum disk size of the virtual machine, and whether or not to store it as a single file or a multiple files (multiple files makes it easier to move to other machines – although I’m not sure how… – but may suffer performance issues with larger disks. Info coutersy of the wizard). I tend to choose single file storage. Change the disk size value according to what you plan on using the VM for – is it just going to remain a barebones installation of Windows, or do you need to install a massive 20GB application into it?

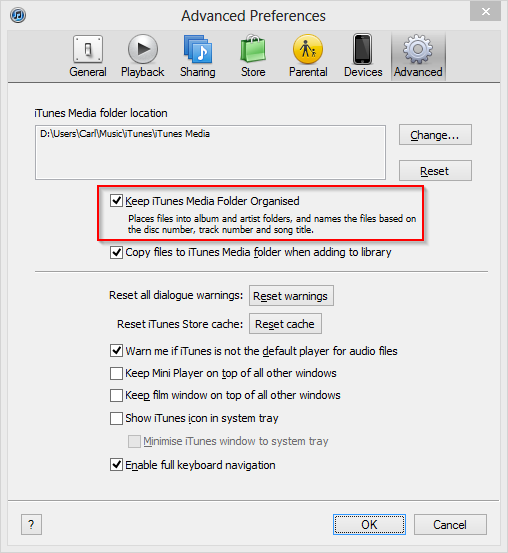
Click Next again, but don’t click Finish. Instead, click Customize Hardware…, which will present a window to change the amount of memory (RAM), processor cores and a host of other options – such as whether you wish to carry over your printers, virtualise a floppy disk drive etc.

Image

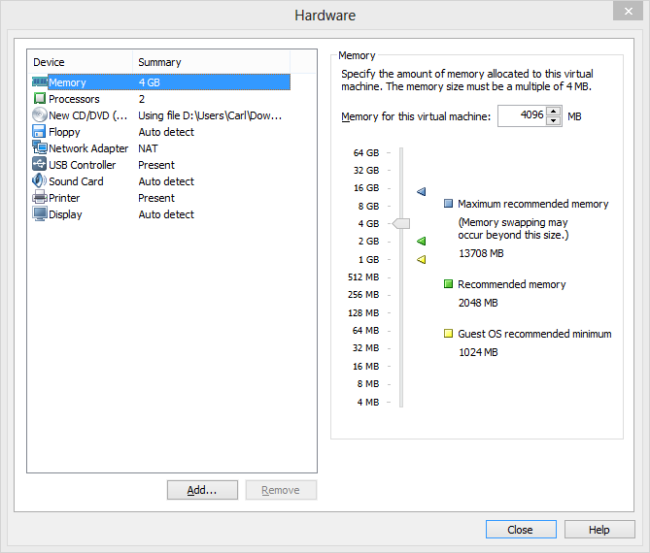
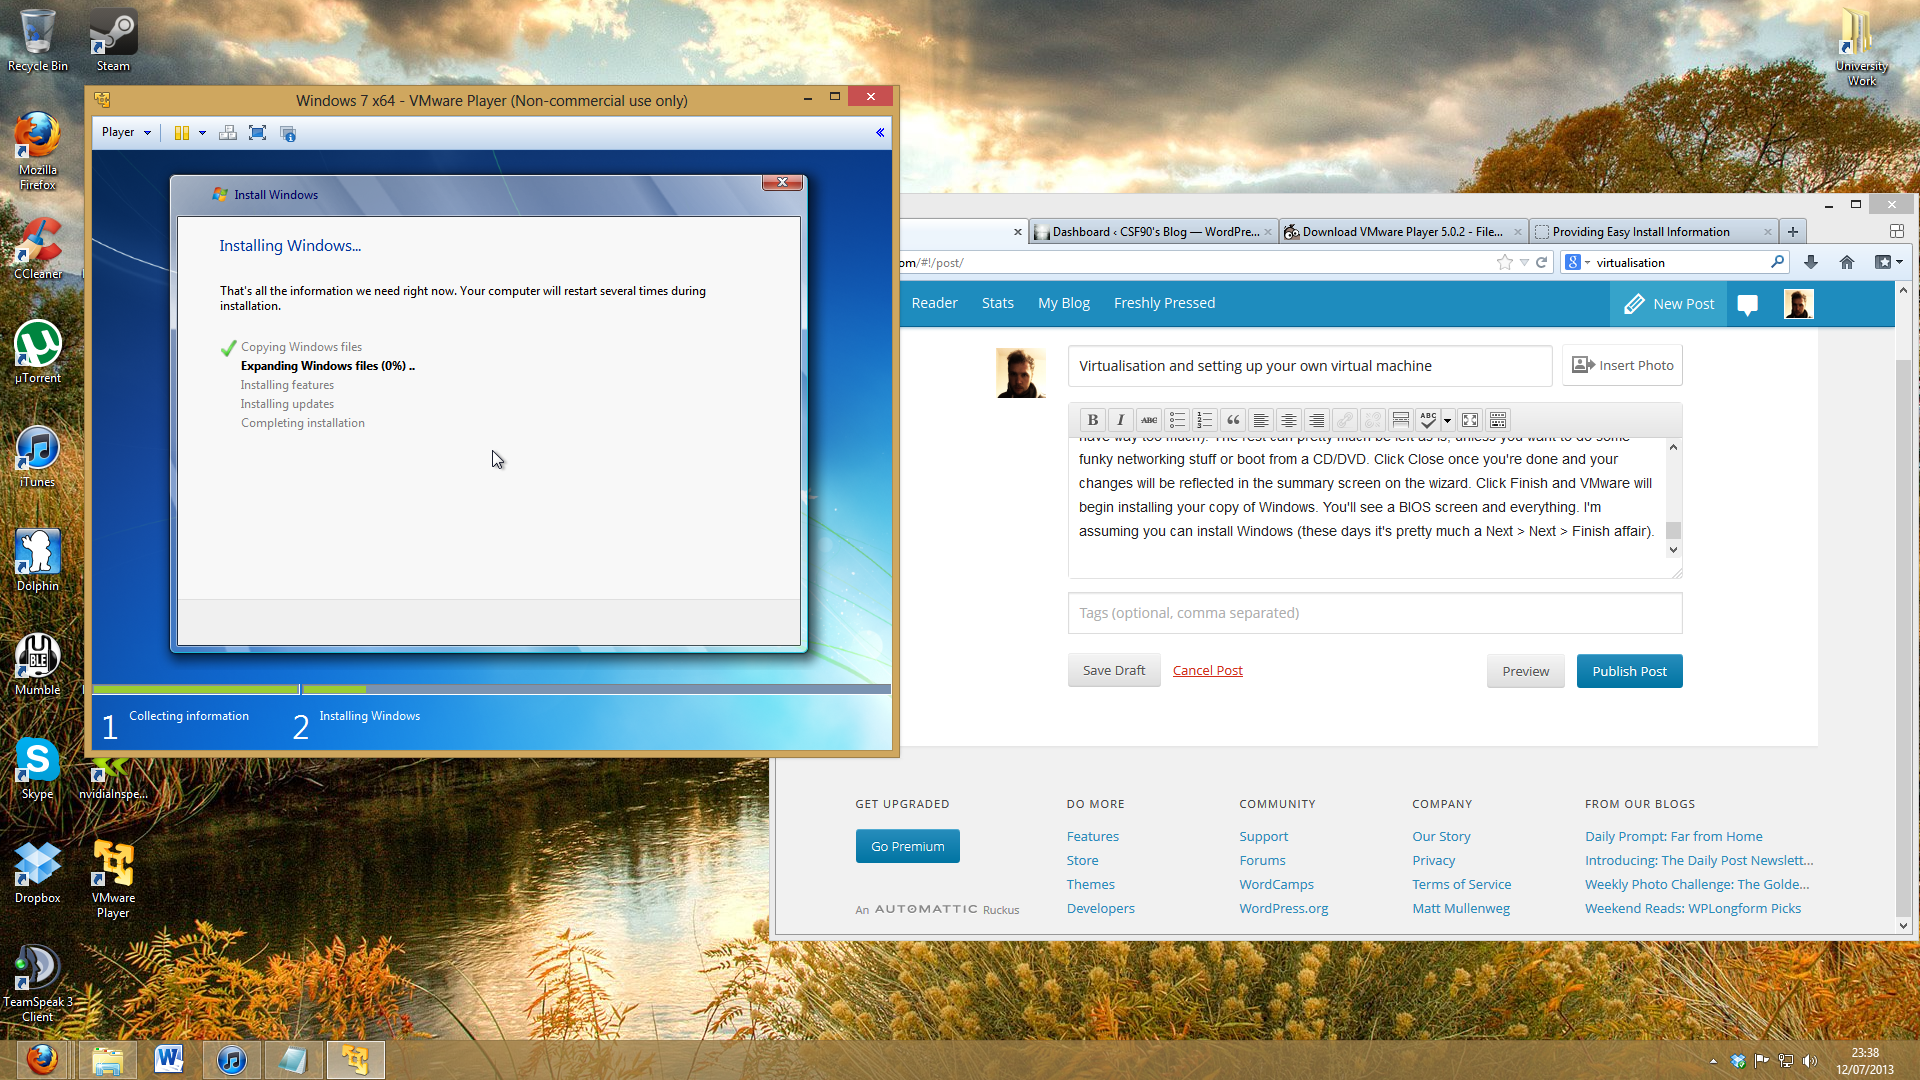
I have a quad-core CPU with hyperthreading (so 4 real cores, 8 including virtualised) so allocated 2 processor cores to this particular VM (making it dual-core), along with 4GB of RAM (I have way too much to spare). The rest can pretty much be left as is, unless you want to do some funky networking stuff (which you will when setting up your own networking lab). Click Close once you’re done and your changes will be reflected in the summary screen on the wizard. Click Finish and VMware will begin installing your copy of Windows. You’ll see a BIOS screen and everything. I’m assuming you can install Windows (these days it’s pretty much a Next > Next > Finish affair). The Easy Install thing means you don’t even need to do that – just wait a few mins it will complete all by itself!

Image

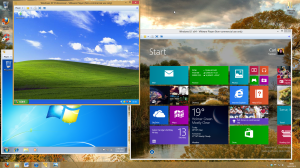
In the screenshot above you can see the Windows setup running in a separate window of my actual Windows 8 installation. Once it has finished installing, install VMware Tools onto the virtual machine to improve performance (this should happen automatically upon first loading Windows within the VM, but if not then ther is an option within VMware Player’s toolbar under Player > Manage > Install VMware Tools) and you’re pretty much good to go. Have a play! You can restart and shutdown the VM as if it were a real PC (which will just close VMware Player), or ‘suspend’ it instead to be able to re-open it exactly as you left it. You can resize the window, or full-screen it so that it was as if the VM was your actual PC.

Well, that’s pretty much all there is to it. You can use your VM as you see fit – you won’t be able to do anything massively graphically intensive as your GPU isn’t virtualised – assume you have the power of basic integrated graphics. With VMs, you can delete them, remake them, move them to other PCs and such. You can even intentionally install viruses on them if you’re crazy, as they are completely separate from your actual OS installation (Note: there may actually be some virus out there that could spread to your PC from a VM. I have no idea).

vmware_player5

Alternative method:
Like I said earlier, and this applies in particular to Windows 8.1 or any other new OS that may not be fully supported by VMware Player and its ‘Easy Install’ thing, there’s an alternative way to create a VM.

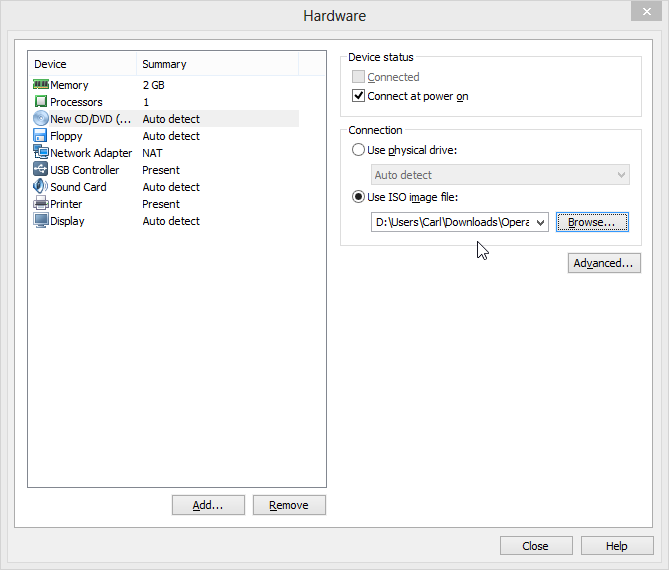
When you have to specify an ISO in the wizard (first screen), don’t – instead say you’ll install the operating system later (last option, so the VM creates a blank hard disk). As a result, at the next step you’ll need to specify the OS you’ll be installing, so select accordingly (they’re general options, like Microsoft Windows, Linux, Other etc., with a dropdown to be more precise – if the actual OS isn’t listed, select the most similar – i.e. Windows 8 x64 if you were installing Windows 8.1 x64). Then, when you customize the hardware – select the CD/DVD drive option and you’ll see choice to use an ISO image file. Browse to the ISO path here and then when the VM boots, it will boot from this ISO and you’ll be able to run the wizard of the operating system you wish to install.

vmware_player6

A blog post about blog posts

24 Jun

Hey all

Sorry it has been a bit quiet here (although views are coming along nicely!). Now University is over, I’ll be posting more regularly.

I have a whole bunch of topics I’d like to ramble about and I’ll be sure to put them up over the coming weeks – for example, the imminent Windows 8.1 developer preview, thoughts on the next-gen consoles/E3 in general, iOS 7 and its new design and other bits and pieces.

So, thanks for reading and stay tuned!

It has been a while… (Downsampling)

12 May

Sorry about that. Had to finish my final year project for University, and now it’s exams – fun times!

For now though, I’ll talk about another topic – downsampling (or downscaling). As always, a bit of background first.

Your monitor, as I’m sure you know, has a resolution which determines the number of pixels it can display. The most common nowadays is 1920×1080 (also known simply as 1080p), which is the resolution certified as being “Full HD”. These are the monitors that are available for around £100 and are the standard for anyone looking to buy one. But, there are higher resolution ones – 26″ screens with a resolution of either 2560×1440 (16:9) or 2560×1600 (16:10 ratio), but these have a massive price spike and normally cost over £400.

The higher the resolution, the sharper your screen (and games) look. It also means you need a more powerful computer though, as more detail is being rendered. As a side note, this is why console games are usually 1280×720 (and usually not even that, natively) – as the consoles aren’t powerful enough to give a consistent framerate at 1920×1080. One advantage of PC gaming!

So, what is downsampling? Well, you can render your game or screen at a higher resolution than your monitor is actually capable of displaying, and then have your graphics card scale it down to match your monitor. What advantages does this bring? It’s a brute-force method of anti-aliasing, used to eliminate those jaggies! I’ve talked about forcing anti-aliasing when games don’t support it (at all, or well enough) using NVIDIA Inspector, and you can also use SweetFX. This third method is another option. I used it recently on Bioshock Infinite, as the game used a pretty poor implementation of FXAA which caused a bit too much blur. Like I said, a higher resolution means a more powerful GPU is needed – so this can only be used on games that you can run with headroom to spare at your actual resolution.

How do you do it? As usual, the following instructions only apply to NVIDIA graphics cards, as that’s what I own. This method is definitely possible on AMD cards, however – there’s a utility called Downsampling GUI which can be downloaded from here (I didn’t make it) and a good guide here. For NVIDIA cards, you don’t need a utility – you can used the default NVIDIA Control Panel. My instructions are based on the ones found here (which I used and worked perfectly, so thanks to the author).

  1. Ensure that you set your graphics card to do the scaling for you, by setting this in your NVIDIA Control Panel.
  2. Now we need to create a custom resolution by clicking Change Resolution on the left, and then the Customize button.
  3. In the new window, click the Create New Resolution button, and then expand the Timing options by clicking the downward arrow icon.
  4. Take a screenshot or mental image of this screen and the settings it contains, as if something goes wrong (which it shouldn’t), then these are what you’ll need to revert back to. Change the standard to Manual from Automatic.
  5. Change the resolution in the top section to 1920×1081 by changing the Vertical Lines field to 1081. This is just so that it is treated and saved as a new resolution (as 1920×1080 already exists), and doesn’t throw an error.
  6. Okay, so this is where it gets going. In this screen, you will see a Pixel clock value (shown in the yellow box in this screenshot). As we change values, the Pixel clock value will change also – it must stay below 165 MHz. Anything equal or higher will not work, and you’ll just get a black display. Lower the value in the blue box (Total Pixels, Vertical) by increments of 1-5 and click Test after each change. Upon testing, you should get a display – it will be blurry, this is normal. What is a failed test is if the display is just black. You must get some output. Once you reach the lowest value which still gives an output for a test, keep it. As an FYI, I managed 1087.
  7. Once you’ve found your lowest value for Total Pixels, Vertical (which will have lowered your Pixel clock), you can raise the Total Pixels, Horizontal until your Pixel clock is at or just below 165 MHz. Test it – again, you should get a display. I managed 2529 before my Pixel clock hit 164.9414 MHz.
  8. This is where things get a bit confusing. You need to find a common resolution that matches your aspect ratio (16:9 for 1920×1080 monitors) and has its horizontal value close to yours. Mine was 2529 – just shy of 2560. So for me, and for most, this will be 2560×1440. But there’s several options – check Wikipedia for some of the more unusual ones. So put this in the top section of the screen (where you previously changed 1080 to 1081). Do one more test, and assuming it worked, click Save.
  9. That’s it – it’s done. This new resolution will be available to choose in any application where you can choose a resolution (i.e. games). Choose it and give it a go!

Thanks for reading. Any questions, just comment (I’m yet to get one!).

Assign yourself a static IP address

13 Apr

There’s 2 types of IP addresses (well, there’s more actually but just go with it…) – internal and external.

An external IP address is assigned by your ISP, and will look slightly less familiar to you than an internal one. It’s not immediately obvious what your external IP is – you’ll have to either check your router page or have a Google (seriously, Google “what is my IP”). You can’t control this IP address and it will even change occasionally (unless you pay your ISP for a static one, in which case it won’t).

The more familiar IP address is internal. Anyone who has set up a home router, or has even a little experience in networking will see the much more familiar pattern of 192.168.x.x. This may also change.

First of all, let’s discuss what an IP address is. It’s an address (duh) that uniquely identifies each computer (or device) on a network, allowing it to be accessed either internally or externally. On a slight side-note, each website address you access is technically an IP address for a server behind the user-friendly site name – your browser uses DNS to translate web addresses into IP addresses.

Anyway, by default, on a home network, your router uses a service called DHCP to dynamically assign IP addresses to every device on the network. For example, say your router (default gateway) is at 192.168.1.1. The DHCP range will probably start from 192.168.1.2 and end somewhere like 192.168.1.100. The first computer you put on the network (or turn on) will be assigned 192.168.1.2, the second assigned 192.168.1.3 and so on (in theory; in practice it’s not always as neat as that).

The problem is this – when you configure your router and open up ports to allow programs to communicate over the internet, host a local server or anything like that, the ports are opened only for a specified IP address. If you turn off your PC, and someone attaches their iPad to the network (for example), that iPad may be assigned the IP address you were once using, and your PC will be given a different one – at which point all of the lovely port forwarding you set up will no longer apply to your PC.

The way around this is to set up a static IP address which, as the name suggests, does not change. This is straight forward and can be done in Windows itself.

First of all, you’ll want to check what your router’s DHCP scope is. This is so you can set yourself an IP address outside of this scope, and it won’t be taken by another PC (or the whole point of the IP address is kind of ruined…). You will be able to configure your router’s DHCP scope.

Image

You can see is the screenshot above that I’ve set my router’s DHCP scope to 192.168.1.2 to 192.168.1.149. This means that any address higher than this will not be assigned by the router, and so are perfect to be set as a static IP for a device.

So, to set a static IP address for your PC, do the following (instructions for Windows 7/8 – you can do it on XP although the interface is slightly different):

  1. Right click the network icon in your taskbar and click “Open Network and Sharing Center”.
  2. On the left of the window that opens, click “Change adapter settings”.
  3. Locate the adapter you’re currently using to connect to the network – this will either be a wired or wireless one. They should be named so you can work out what you’re using. If you’re connecting wirelessly, look for the adapter with “Wi-Fi” or “WLAN” in the name. If you’re wired, look for “Ethernet”.
  4. Right click and click Properties (you’ll need administrator privileges at this point)
  5. In the new Properties window, find the entry called “Internet Protocol Version 4 (TCP/IPv4)”, select it and click the Properties buttonImage
  6. OK, this is where the magic happens! By default, the “Obtain and IP address automatically” and “Obtain DNS server address automatically” will be checked. You want to check the the two “Use the following” options and enter in your details. In the IP address field, enter in an IP address outside of your DHCP scope. Remember how mine ended at 192.168.1.149? So I’ve set my IP to be 192.168.1.150. The subnet mask is 255.255.255.0, and the default gateway is your router’s IP address (what you type in the URL bar to access your router’s settings page). For the DNS server, you can either use your ISP’s DNS servers, which will be displayed somewhere in your router settings (if not, have a Google as your ISP should have them available on a support page or something) or, you can use some open DNS (such as OpenDNS or Google Public DNS, which are the ones in the screenshot). Choice is yours. Unfortunately, you can’t let Windows obtain them automatically when you’re using a static IP address – not sure why this is to be honest. I wouldn’t check ‘Validate settings upon exit’ because all that seems to do for me is get Windows to run a wizard which then sets everything back to being obtained automatically. Just click OK, and try and access a website.Image

That’s it. You have a static IP address which won’t change, so you can open ports/make configurations to your router to your heart’s content without worrying about them becoming invalid!

If you move your computer onto a different network, or get a new router, then you’ll probably need to adjust these settings or set them back to being automatically obtained in order to restore connectivity (unless the network you’re moving to is configured similarly to yours).

Thanks for reading!

Set up your own Mumble server

13 Apr

Hi everyone

In this post I’m going to give a guide on how to set up your own Mumble server. There’s already a guide on their official wiki here, but I’m going to try and make this step-by-step and easier to follow, even for a non-technical user.

If you don’t already know, Mumble is an open-source and free VoIP program which has several features that means I prefer it to the most popular choice – Skype. Not that there’s anything wrong with Skype.

Anyway, whereas with Skype you are using a P2P connection to chat, with Mumble you can host your own server on your local PC, and have other users connect to you. Either method is effective, and that’s not the reason I prefer Mumble. I prefer Mumble because it has voice-activation detection (so the mic will automatically pick up noise above a certain level) whereas Skype is always-on. It also has a much wider range of settings to play with. Finally, it also has a nicer overlay, but that’s just a little thing.

Anyway, to set up a Mumble server, you first need to download it from here and then install it. When you install it, make sure you choose to install Murmur too, which is the server component and is required to host your own server.

Okay, first thing’s first – you need to configure your router to open up a port. You probably also want to assign yourself a static IP address (see this blog post on how).

Set up your static IP first. Remember to set it outside of your router’s DHCP range, or it might be assigned to another PC first!

Unfortunately opening ports on a router depends on the firmware used on the router, which in turn depends on the make/model. I’m using a Huawei EchoLife HG532 (it’s provided with TalkTalk Fibre Optic broadband and does a decent job, so haven’t felt the need to replace it), so that’s what my screenshots are from. Have a look in similarly named parts of your router’s interface and I’m sure you can figure it out – such as NAT, Port Forwarding etc.

Some of the fields in the screenshot below may differ from yours, but you should be able to work it out.

murmur_port

You can see that the port you need to open is 64738 – make sure you set it as TCP/UDP protocol. Using one or the other won’t work. It should be both your internal and external port. This is the default port for Murmur – you can change it to another if you prefer in the configuration file (which I’ll touch on later).

The internal host is the internal static IP you have set for your PC – in my case it’s 192.168.1.150. I’ve given the rule a self-explanatory name of “Murmur”. That’s pretty much it. The remote host field isn’t needed. You can check if you’ve done it correctly using a site such as http://www.canyouseeme.org/, although don’t take the results for this as gospel, as it’s not always accurate. The best way to check is to try and have someone connect.

OK, so we’ve opened the required port. If you go to your Mumble installation directory (default at C:\Program Files (x86)\Mumble) then you will find a file called “murmur.ini”, which is the configuration file. Open it using a text editor, such as Notepad (or even better, Notepad++). In this you can change the settings for you server.

You can leave most of it as it is – things you might want to set are a server password, limit the number of users who can connect simultaneously, change the port it uses and change the welcome message. To do so, find the relevant lines in the file and uncomment them (delete the #) and set it to what you want. So for example, to change the server password, find and change to the following:

# Password to join server
serverpassword=yourpassword

Once you’ve made any changes you want, save and close the file. Run the “murmur.exe” file in the same folder as the configuration file to start your server (it will start minimized and running in the taskbar) – double click it to show it and you can check the text logs. Now this is running, people should be able to connect to your server.

Connect to your own server by running Mumble – your server will appear under the LAN group, and will have 0 ping (as it’s your own PC).

mumble_local

For your friends to connect, you’ll need to provide them with server details. These can be a bit confusing if you haven’t set up a more user-friendly host name (coming in another post!).

They’ll need to click the ‘Add New…’ button which can be seen in the previous screenshot, at which point they’ll be shown the following.

new_mumble_server

The Label field is just whatever they want to name the server (e.g. CSF90’s Server). The address field defines the server they’re connecting to – they’ll need either your external IP address or your host name. You can find your external IP by Googling “my IP” or “what is my IP” or something like that, and Google will helpfully tell you. There’s a small security risk about giving out your external IP address, which is why setting up a host name is preferred. The Port field will be the port you specified in the configuration/opened on your router (shown as the default), and the Username is what they want their name to appear as when connected.

That’s it – assuming it’s set up correctly, they’ll be able to connect!

Removing empty folders

13 Apr

I’d just like to share a useful tool I’ve found today that scans for and removes empty folders. I’d looked into doing this via scripting myself in the past, with mixed success (special characters seemed to pose a problem), but thankfully there’s a great open-source utility to do it for me!

Anyway, I’ve transferred my pretty large iTunes music library from computer to computer over the years, and as such new artwork is downloaded, folders are emptied or unused etc., and it all got a bit messy. I remember manually searching for any old Thumbs.db files within the thousands of subfolders and deleting them a couple of years back. Anyway, this utility provides a nice interface to scan for empty folders within a certain directory, and then choose to remove (or ignore) them.

It’s called RED (Remove Empty Directories) and can be found here.

You can scan any folders you want, but a word of warning is that some folders, despite being empty, can be pretty important (especially those in C:\Program Files or C:\windows), so it’s best to leave them. Choose where you scan carefully to minimize time spent unselecting folders you’re not sure about. Also, some folders (such as cache folders or those in %AppData%) will probably just be re-created the next time you open the relating application, so don’t worry too much about those.

RED does contain some options to tweak your scanning/searching, so have a look in there too.