Hey all
This post I’m going to talk about virtualisation and then touch upon how to make your own virtual machine in a home environment. In a future post I’ll demonstrate virtualisation as you’d see it in a business environment.
Virtualisation (and I’m pretty much going to copy Wikipedia with this definition) is the simulating of hardware platform, operating system, storage device or network resources. This brings several benefits which I’ll explain.
Think of a business and their network/IT setup. A typical company needs file storage, email management, a domain environment and probably some printers (amongst other things). For each of these roles, they would usually have separate, dedicated servers (although it’s possible to have more than one role on a server, generally speaking – and necessary for Exchange – it’s best practice to have them on dedicated, separate ones). Servers are effectively powerful computers with higher-quality components – how powerful they are depends on how much you spend on one obviously. But how much power is really needed to be a domain controller, a printer server or store a load of files? In terms of CPU and RAM: very little, and indeed a server will actually spend most of its time idle or quietly going about its business without ever really breaking a sweat. So, you could potentially have 5 dedicated, expensive servers costing thousands of pounds, and them barely being used to their potential – just for the sake of best practices. Enter VMware (disclaimer: other virtualisation tools available).
VMware allows you to run multiple ‘virtual machines’, entire Windows or Linux or whatever installations, on a single computer. They are entirely separate from each other, and use the host machine’s hardware resources accordingly. Suddenly, you can buy just one server and have all 5 of your required roles on it, which is a very cost effective solution. You can even scale your required hardware accordingly, and buy a cheaper, less-powerful microserver and ensure you’re using it to the max. An entire network running on a few hundred pounds of equipment rather than thousands.
Alternatively, virtualising a different or older operating system is useful for compaitibility. Imagine an old application, written in 2004 and never updated. It was designed to work on Windows XP, and will not run on Windows Vista, 7 or 8 – but it’s critical to your business. It’s expensive to hire a software developer to rewrite or update the software. So, what can you do? Run it in a virtual machine! Or, well, downgrade your computers to Windows XP – but that sucks, get with the times!
In fact, Microsoft actually accounted for this with Windows 7 Professional by including (as an optional download) XP Mode. which uses Microsoft’s own virtualisation technology to run a Windows XP installation within Windows 7. This was pretty cool as it allowed the application to appear as a normal entry in your Start Menu (although with “XP Mode” next to its name) and then only the application would run within a VM – the experience was fairly transparent to a normal user. Regardless, if you don’t have Windows 7 Professional/Enterprise/Ultimate, there are other ways to create VMs and virtualise applications.
Finally, virtual machines are good for just testing things out, or reminiscing about simpler times. I’ve set up 2 recently – one to check out the Windows 8.1 Developer Preview (blog incoming on that) and one due to bad website design – I was applying for a job, and their online application system required Windows XP, Vista or 7. I’m using Windows 8. Amazingly, I couldn’t use their system. So, I created Windows 7 VM (no need to enter a product key or activate it because it was only a short-term thing) and used that instead for their online system. Ridiculous, but hey, it worked. Maybe they’ll appreciate my workaround!
Anyway, the first thing to do it make sure your computer is powerful enough to run a virtual machine. Don’t forget, you are effectively allocating your computer’s resources to another computer which will run within your computer. Computerception. RAM will be the most crucial resource here. If you’re not sure of your computer’s specification, I’d recommend the aptly named Speccy software application (http://www.piriform.com/speccy/download/standard) which I’ve mentioned before. You’ll probably want at least 3GB of RAM in your PC to run a decent virtual machine and be able to allocate it 1GB.
Anyway, VMware Player is the key application here, and is a free download from http://www.filehippo.com/download_vmware_player/. As a note, I like to use FileHippo for downloads as it doesn’t make you use a sign up process, or browser-based installations or any of that rubbish. Just good ol’ standalone executables/MSIs.
Assuming you’ve installed VMware Player (which requires a reboot), next you’ll need an ISO image of your operating system of choice. I won’t ask how you got them – I’ll be an optimist and assume it’s all nice and legal.
Open up VMware Player and you’ll see the home screen with an option to Create a New Virtual Machine, which when clicked will start a wizard. Ah, wizards.
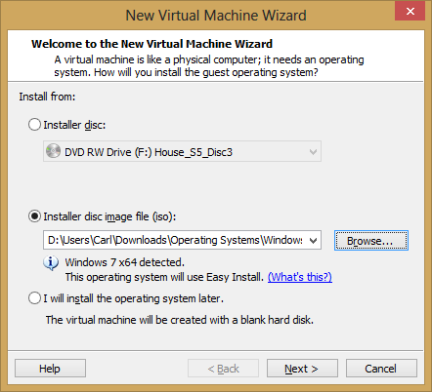
From here, either select the disc location (if you have a disc) or browse to the ISO file. Upon selecting an ISO, VMware Player will try and detect the operating system and may try to simplify the install using its ‘Easy Install’ which will automate the actual installation of Windows and the usual initial setup steps, like creating a username and password, by asking you for it during the wizard beforehand. If it doesn’t detect the OS, then don’t worry. There’s an alternative method which I’ll add to the bottom of this post.
In the image above, I’ve browsed to a Windows 7 Professional ISO. Clicking Next will prompt you for the Easy Install info – you’ll need to enter a name at least, select the version of WIndows if you have a full fat ISO (Windows 7 ISOs actually contain all of the data for every version of the OS – what is installed depends on your selection/product key entered) and a Windows product key depending on your version (i.e. for Windows Vista and 7, you don’t need to enter one and you can use the OS for 30 days before having to activate it. Windows XP is more strict and requires a Product Key during installation…). Click Next once you’re done – you’ll be warned about not entering a product key, but just continue anyway. Now you can give the VM a name and choose its location (defaults are fine). Clicking Next yet again allows you to specify the maximum disk size of the virtual machine, and whether or not to store it as a single file or a multiple files (multiple files makes it easier to move to other machines – although I’m not sure how… – but may suffer performance issues with larger disks. Info coutersy of the wizard). I tend to choose single file storage. Change the disk size value according to what you plan on using the VM for – is it just going to remain a barebones installation of Windows, or do you need to install a massive 20GB application into it?
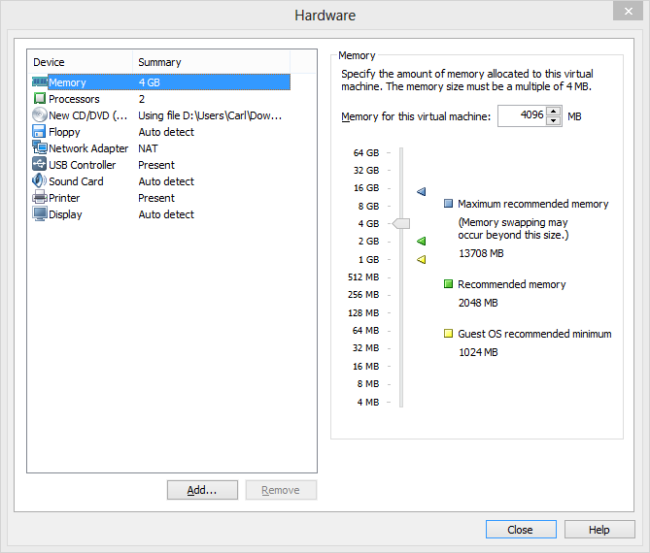
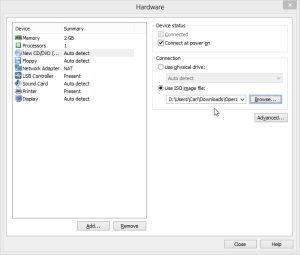
Click Next again, but don’t click Finish. Instead, click Customize Hardware…, which will present a window to change the amount of memory (RAM), processor cores and a host of other options – such as whether you wish to carry over your printers, virtualise a floppy disk drive etc.
I have a quad-core CPU with hyperthreading (so 4 real cores, 8 including virtualised) so allocated 2 processor cores to this particular VM (making it dual-core), along with 4GB of RAM (I have way too much to spare). The rest can pretty much be left as is, unless you want to do some funky networking stuff (which you will when setting up your own networking lab). Click Close once you’re done and your changes will be reflected in the summary screen on the wizard. Click Finish and VMware will begin installing your copy of Windows. You’ll see a BIOS screen and everything. I’m assuming you can install Windows (these days it’s pretty much a Next > Next > Finish affair). The Easy Install thing means you don’t even need to do that – just wait a few mins it will complete all by itself!
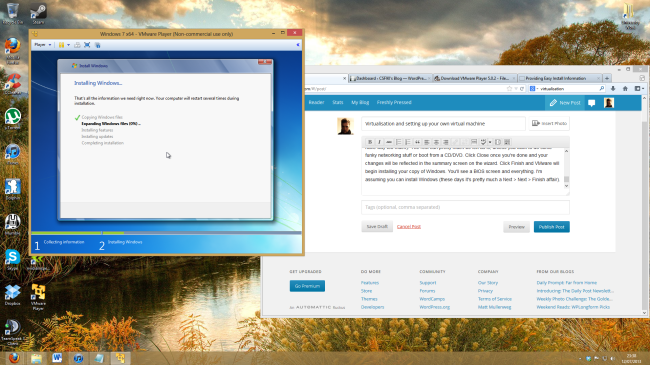
In the screenshot above you can see the Windows setup running in a separate window of my actual Windows 8 installation. Once it has finished installing, install VMware Tools onto the virtual machine to improve performance (this should happen automatically upon first loading Windows within the VM, but if not then ther is an option within VMware Player’s toolbar under Player > Manage > Install VMware Tools) and you’re pretty much good to go. Have a play! You can restart and shutdown the VM as if it were a real PC (which will just close VMware Player), or ‘suspend’ it instead to be able to re-open it exactly as you left it. You can resize the window, or full-screen it so that it was as if the VM was your actual PC.
Well, that’s pretty much all there is to it. You can use your VM as you see fit – you won’t be able to do anything massively graphically intensive as your GPU isn’t virtualised – assume you have the power of basic integrated graphics. With VMs, you can delete them, remake them, move them to other PCs and such. You can even intentionally install viruses on them if you’re crazy, as they are completely separate from your actual OS installation (Note: there may actually be some virus out there that could spread to your PC from a VM. I have no idea).
Alternative method:
Like I said earlier, and this applies in particular to Windows 8.1 or any other new OS that may not be fully supported by VMware Player and its ‘Easy Install’ thing, there’s an alternative way to create a VM.
When you have to specify an ISO in the wizard (first screen), don’t – instead say you’ll install the operating system later (last option, so the VM creates a blank hard disk). As a result, at the next step you’ll need to specify the OS you’ll be installing, so select accordingly (they’re general options, like Microsoft Windows, Linux, Other etc., with a dropdown to be more precise – if the actual OS isn’t listed, select the most similar – i.e. Windows 8 x64 if you were installing Windows 8.1 x64). Then, when you customize the hardware – select the CD/DVD drive option and you’ll see choice to use an ISO image file. Browse to the ISO path here and then when the VM boots, it will boot from this ISO and you’ll be able to run the wizard of the operating system you wish to install.

